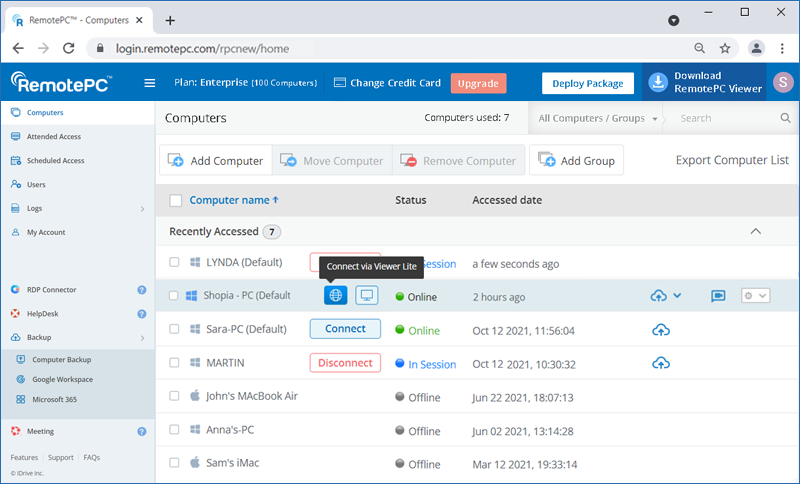
Yes, you can connect to your remote computers from a web browser, via RemotePC Viewer Lite or by downloading the RemotePC app launcher.
To connect via RemotePC Viewer Lite,
- Inicie a sessão no RemotePC através do navegador Web.
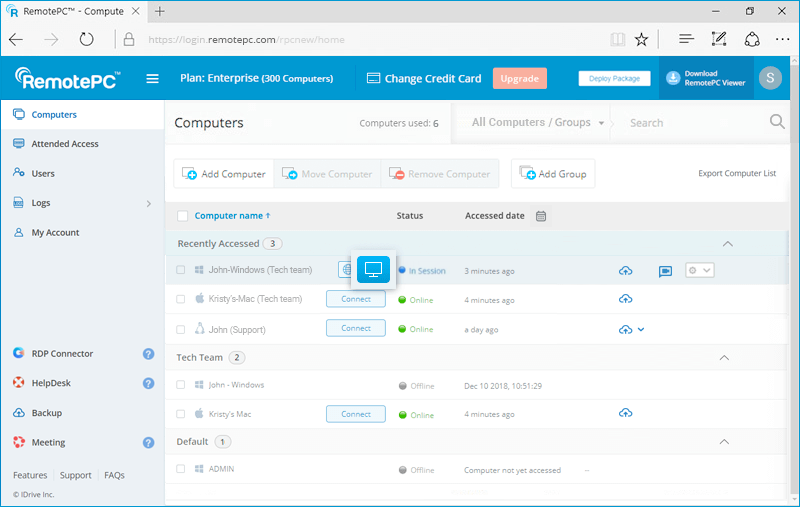
- Hover over the 'Connect' button corresponding to an online computer and click
 .
.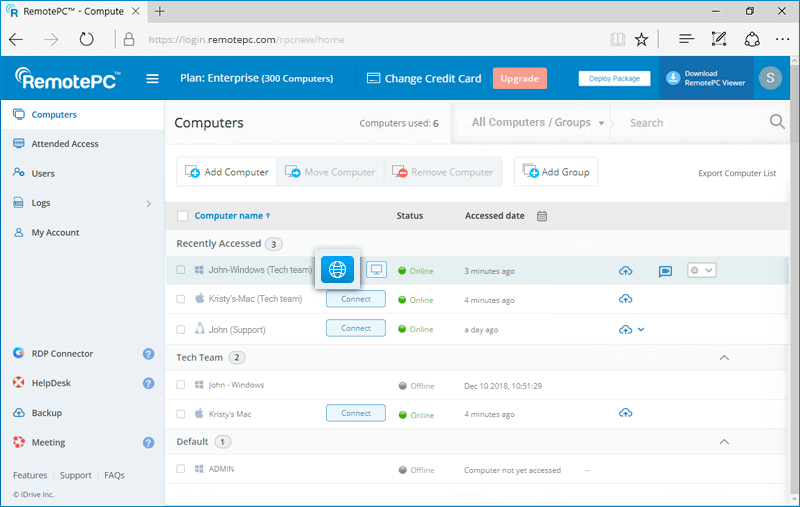
- Enter the 'Personal Key' (if configured) and click 'Connect'.
To connect via RemotePC desktop application,
- Hover over the 'Connect' button corresponding to an online computer and click
 .
.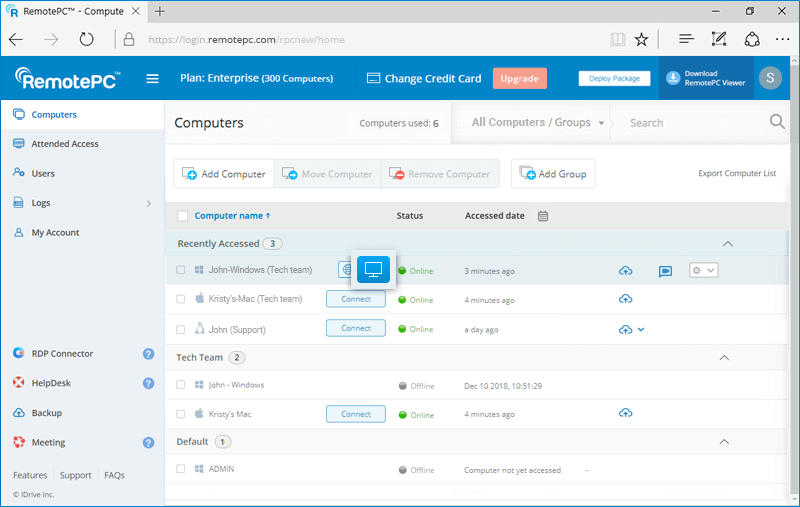
- Download and run the RemotePC launcher to initiate a remote session.
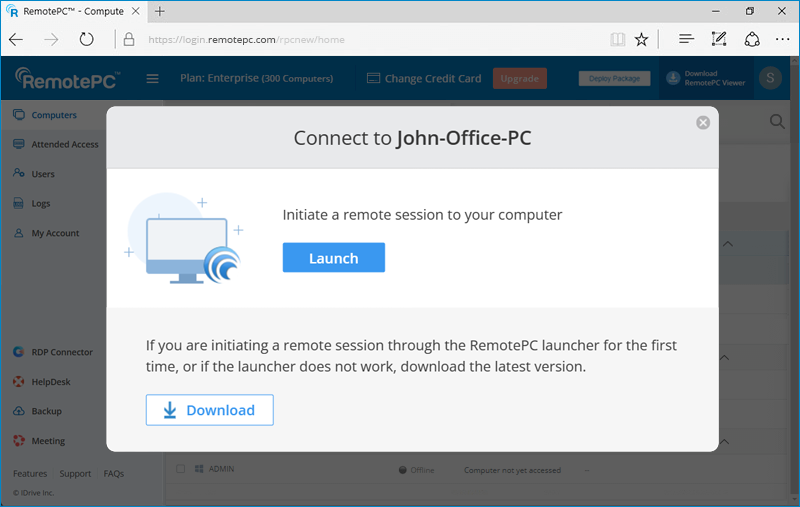
For subsequent remote sessions, simply click ![]() to establish a connection.
to establish a connection.
Yes, multiple users can simultaneously access the same remote computer.
Para ligar a um computador remoto,
- Inicie sessão no RemotePC através de um navegador da Web.
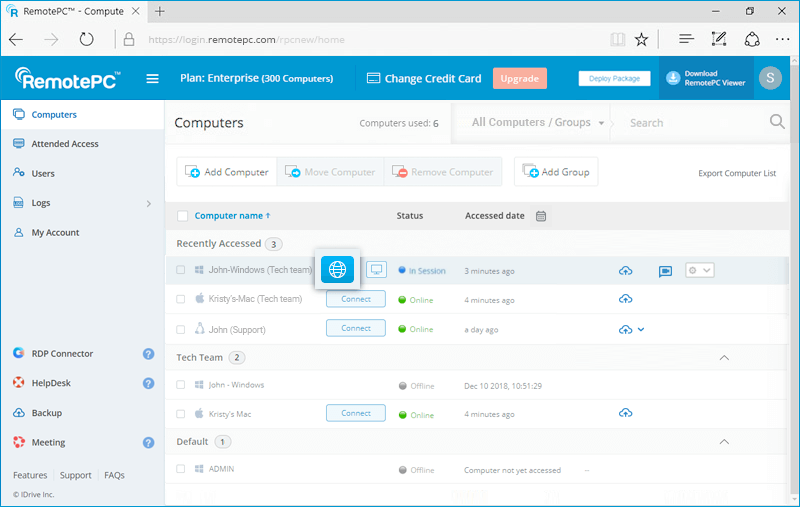
- The 'Computers' tab will display all the configured computers. The status will read 'In Session' if a computer is being accessed by one or more users.
- Hover over 'Connect' and click to establish a simultaneous remote connection via RemotePC Viewer Lite.
Em alternativa, clique em
 to establish a simultaneous remote connection via RemotePC desktop application.
- Enter the 'Personal Key' (if configured) and click 'Connect'.
Under 'Computers' in RemotePC web console displays the list of all your configured computers and their status. You can connect to any online computer by providing the personal key (if configured) and also view the remote access/web activity logs of the computer.
Admin of an Enterprise account can add users, create user/computer groups, access and manage the associated computers by logging into RemotePC via web.
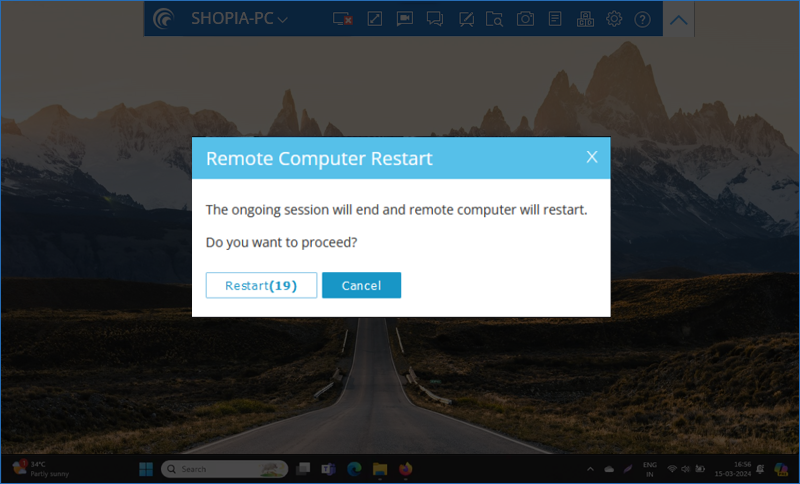
Para reiniciar um computador remoto,
- Log in to RemotePC via web browser and go to 'Computers'.
- Hover on the computer you wish to restart and click
 .
. - Select 'Restart'.
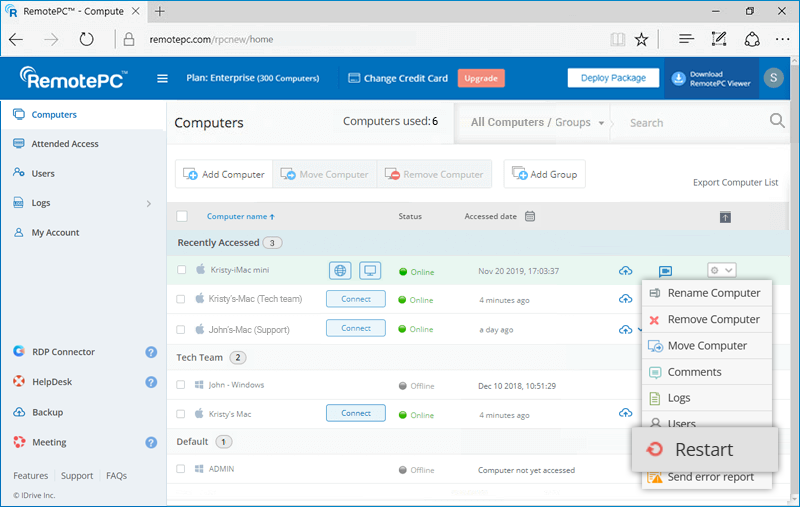
- In the confirmation popup, click 'Ok'.
To restart the remote computer during the remote session, refer this FAQ.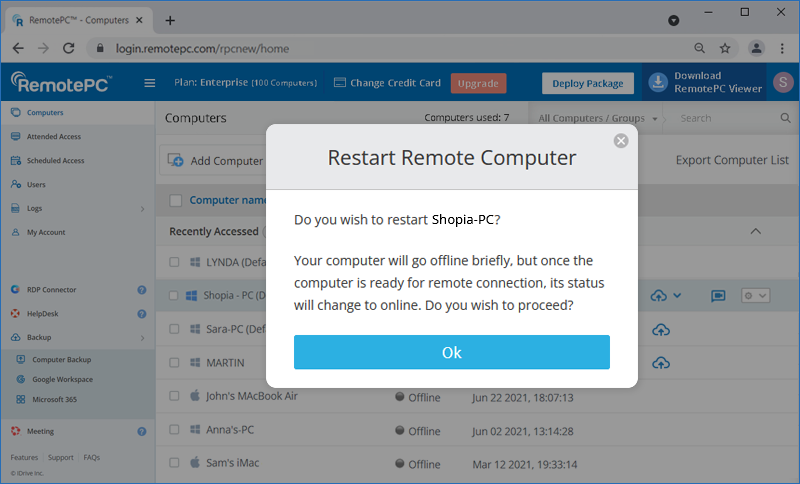
Note: For Windows machines, an additional option to 'Restart in safe mode' will also appear. Your computer will go offline briefly, but once the computer becomes ready for remote connection, its status will change to online.
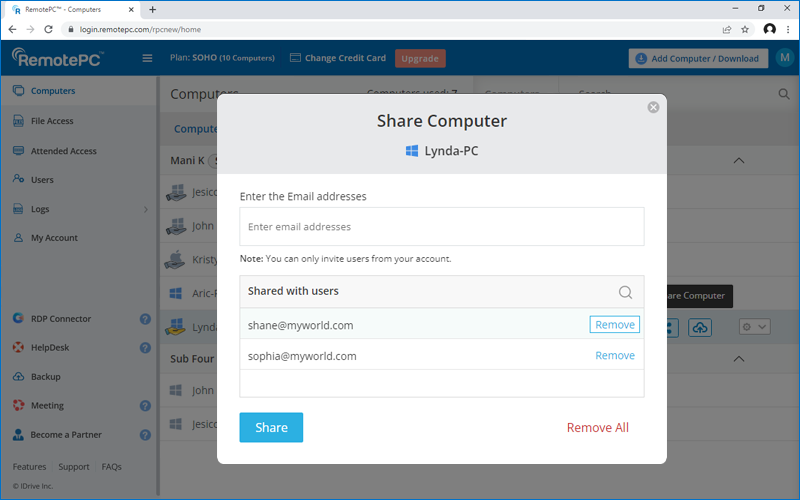
Sim, os utilizadores de contas dos planos SOHO e Team podem partilhar um computador configurado com outros utilizadores para acesso remoto.
Para partilhar um computador, clique em ![]() correspondente ao computador pretendido, introduza o endereço de correio eletrónico dos utilizadores do RemotePC pretendidos e clique em "Partilhar".
correspondente ao computador pretendido, introduza o endereço de correio eletrónico dos utilizadores do RemotePC pretendidos e clique em "Partilhar".

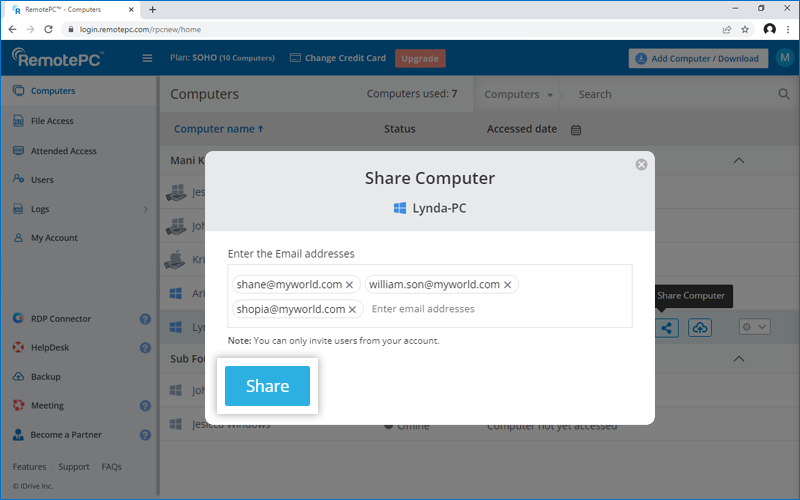
The intended recipients will be able to see the computer under the 'Shared with me' group in the 'Computers' tab.
Nota:
- Só é possível partilhar um computador com utilizadores da sua conta RemotePC.
- Users will only be able to access the shared computer remotely. They will not be able to make any modifications in the computer settings.
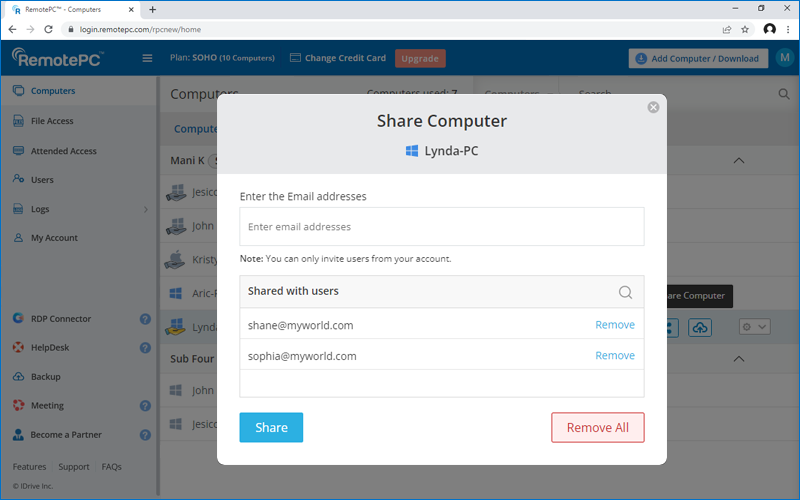
To stop sharing a computer for a particular user, click ![]() to open the 'Share Computer' popup, and click 'Remove' next to the user.
to open the 'Share Computer' popup, and click 'Remove' next to the user.
To stop sharing the computer for all users, click 'Remove All'.
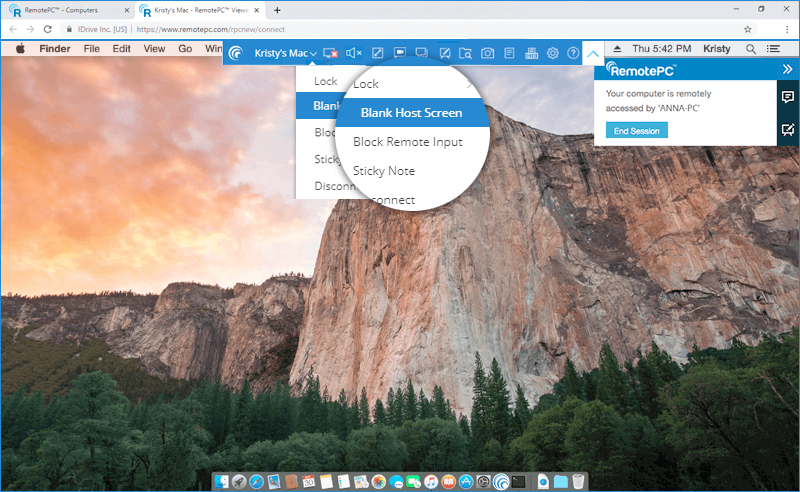
Yes, the 'Blank Host Screen' feature allows you to make the screen of your computer blank, during a remote session. This prevents others from viewing your activities on the remote computer.
Para apagar o ecrã do anfitrião,
- Inicie a sessão no RemotePC através do navegador Web.
- Select the online computer that you want to access and click 'Connect'.
- Enter 'Personal Key' (if configured) and click 'Connect'. Remote access to the computer is established.
- Clicar
 to expand the menu bar.
 - Click the computer name -> 'Blank Host screen'.
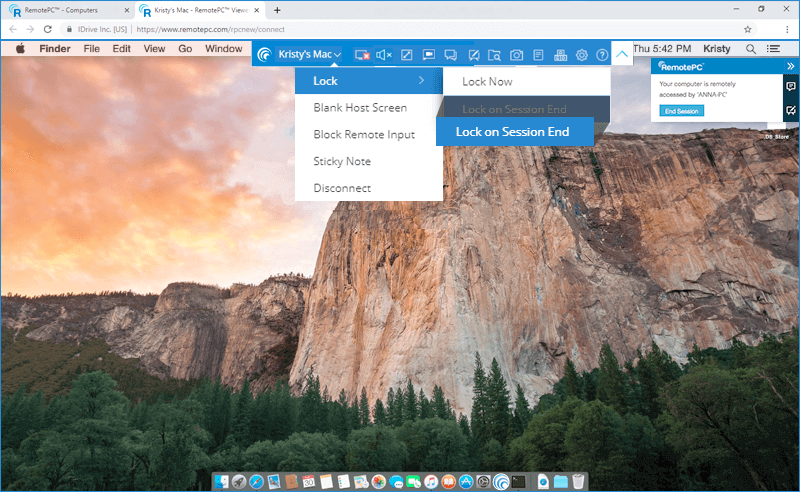
The Lock function allows you to lock the remote computer instantly or after the session ends. This will prevent any unauthorized access to your remote computer.
Para bloquear,
- Inicie a sessão no RemotePC através do navegador Web.
- Select the online computer that you want to access and click 'Connect'.
- Enter the 'Personal Key' (if configured) and click 'Connect'. Remote access to the computer is established.
- Clicar to expand the menu bar.
- Click the computer name to perform any of the following:
- Click 'Lock' - > 'Lock Now', to instantly lock the remote computer.
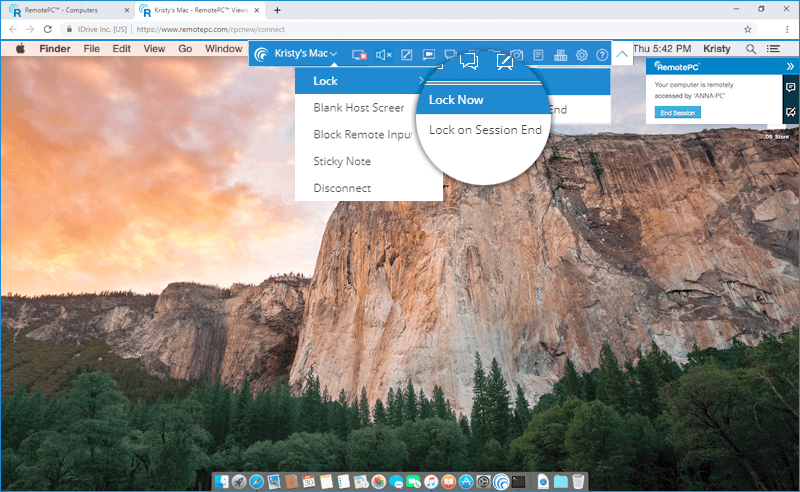
- Click 'Lock' - > 'Lock on Session End', to lock the remote computer as soon as the remote session ends.
- Click 'Lock' - > 'Lock Now', to instantly lock the remote computer.
Yes, you can chat during a remote session, from the RemotePC web interface.
Para iniciar uma conversa,
- Inicie a sessão no RemotePC através do navegador Web.
- Select the online computer that you want to access and click 'Connect'.
- Enter the 'Personal Key' (if configured) and click 'Connect'. Remote access to the computer is established.
- Clicar to expand the menu bar.
- On clicking
 , the Chat screen appears.
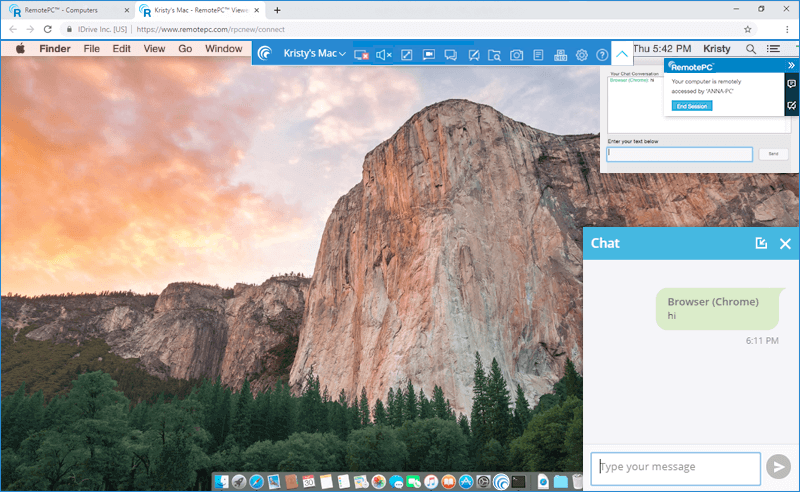
- Enter your text in the 'Type your message' field and click
 .
.
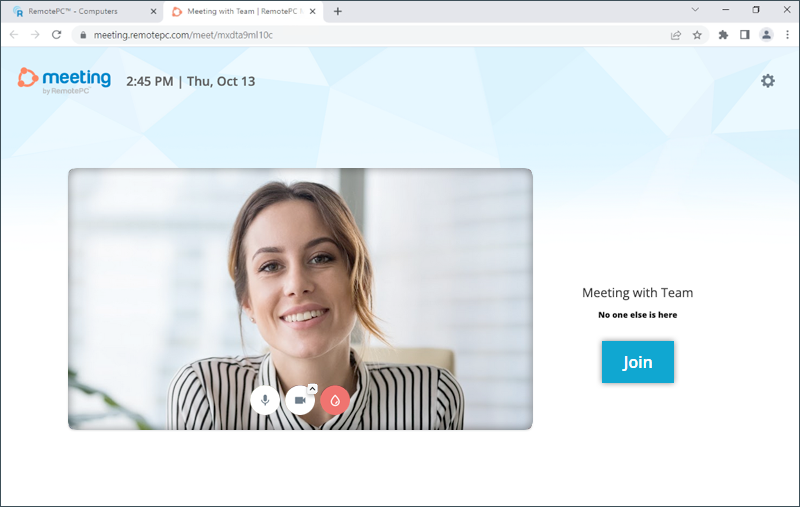
Sim, é possível conversar por vídeo com utilizadores remotos.
To begin the video chat without initiating a remote seesion,
- Inicie a sessão no RemotePC através do navegador Web.
- Hover over the computer you wish to proceed with video chat and click
 .
.
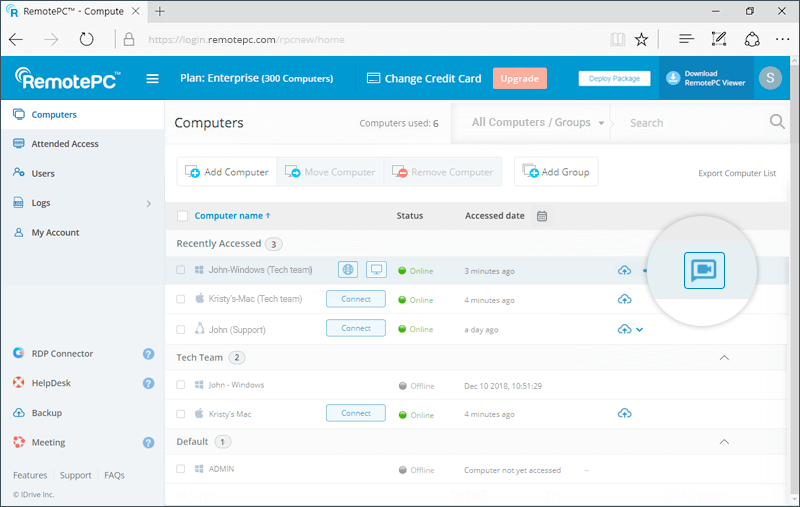
- O ecrã do RemotePC Meeting é iniciado automaticamente. Pela primeira vez, o utilizador e os utilizadores remotos terão de dar permissão para aceder à câmara e ao microfone nos seus computadores.
- Quando a autorização for concedida, clique em "Join" (Participar) para iniciar a videochamada.
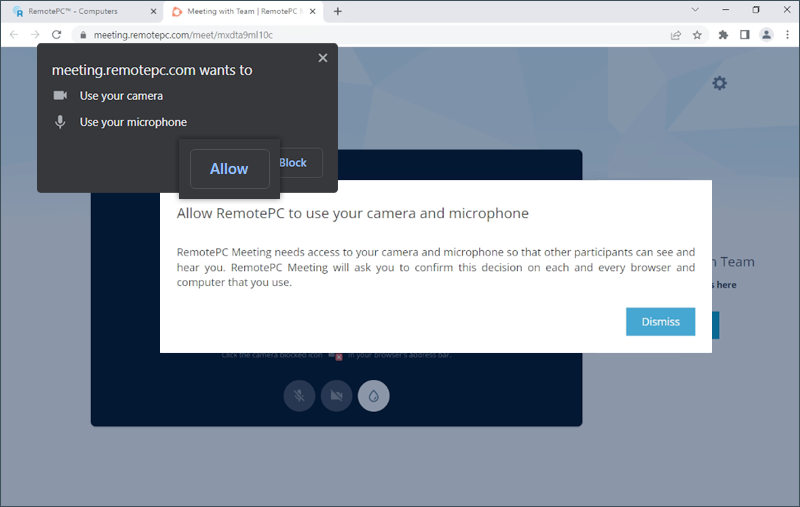
To begin the video chat, during a remote session,
- Inicie a sessão no RemotePC através do navegador Web.
- Select the online computer that you want to access and click 'Connect'.
- Enter the 'Personal Key' (if configured) and click 'Connect'. Remote access to the computer is established.
- Clicar to expand the menu bar
- On clicking , the RemotePC Meeting screen will automatically launch. For the first time, you and the remote users will need to provide the permission to access the camera and microphone on your computers.
- Quando a autorização for concedida, clique em "Join" (Participar) para iniciar a videochamada.
Yes, to take screenshot,
- Log in to RemotePC via web browser and go to 'Computers'.
- Hover on the computer you wish to connect and click .
- Click on
 to take a screenshot.

- The screenshot will be downloaded to your local machine. Screenshots will be saved to your default downloads folder. If not, there will be a prompt to save the screenshots in your desired destination.
You can also find the screenshots in your account. To view saved screenshots,
- Log in to RemotePC via web browser and click 'Logs'.
- Go to 'Unattended Access Logs' and click
 .
.

- The saved screenshots will be displayed.
Yes, you can use the Whiteboard to draw on the remote screen and collaborate effectively while accessing your computer via the web.
- Inicie a sessão no RemotePC através do navegador Web.
- Select the online computer that you want to access and click 'Connect'.
- Enter the 'Personal Key' (if configured) and click 'Connect'. Remote access to the computer is established.
- Clicar to expand the menu bar.
- On clicking
 , the Whiteboard panel appears on the screen.
You can perform the following:
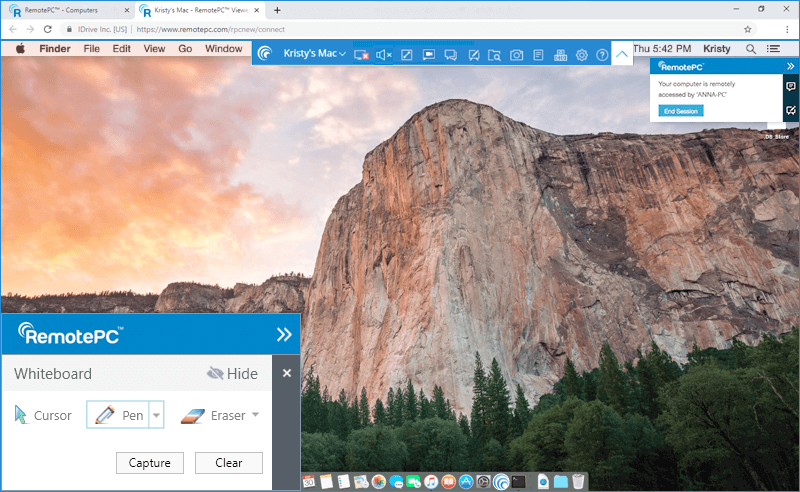
- Cursor is selected by default and it allows you to access the remote computer.
- Pen can be used to draw on the remote screen. You can choose a line width or color of your preference.
- Eraser is used to clear parts of the drawing on the screen. You can choose a suitable width for the eraser.
- Capture option lets you save a screenshot on the local computer.
- Clear option can be selected to clear the entire drawing on the screen.
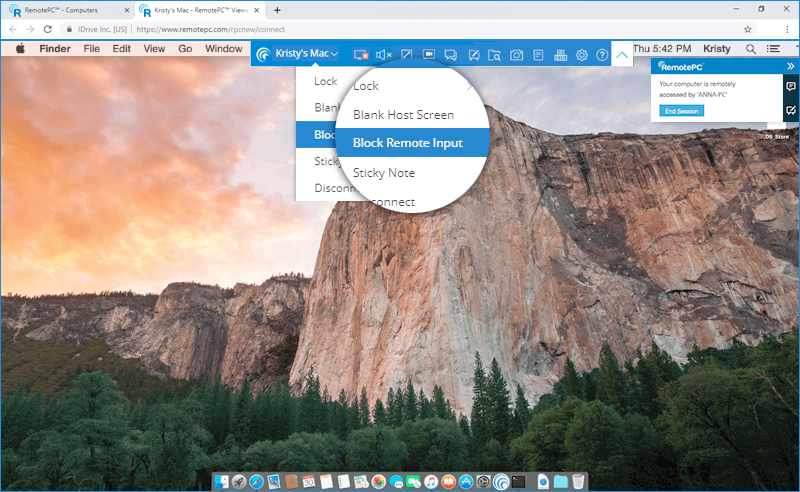
How do I prevent others from using mouse or keyboard on the remote computer during a remote session?
You can use the 'Block Remote Input' feature to prevent anyone from using a mouse or keyboard on the remote computer during a remote session.
Para bloquear a entrada remota,
- Inicie a sessão no RemotePC através do navegador Web.
- Select the online computer that you want to access and click 'Connect'.
- Enter the 'Personal Key' (if configured) and click 'Connect'. Remote access to the computer is established.
- Clicar to expand the menu bar.
- Click the computer name -> 'Block Remote Input'.
Yes, if your remote computer has more than one monitor, you can access any of them from the RemotePC web interface.
To switch between multiple monitors,
- Inicie a sessão no RemotePC através do navegador Web.
- Select the online computer that you want to access and click 'Connect'.
- Enter the 'Personal Key' (if configured) and click 'Connect'. Remote access to the computer is established.
- Clicar to expand the menu bar.
- On clicking
 , you can switch between multiple monitors of the remote computer.
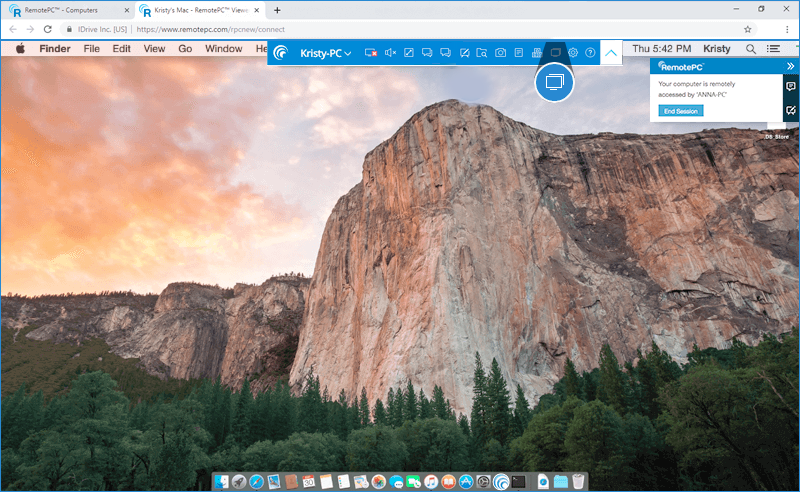
Em alternativa, clique em
 and click a monitor name to view that individual monitor.
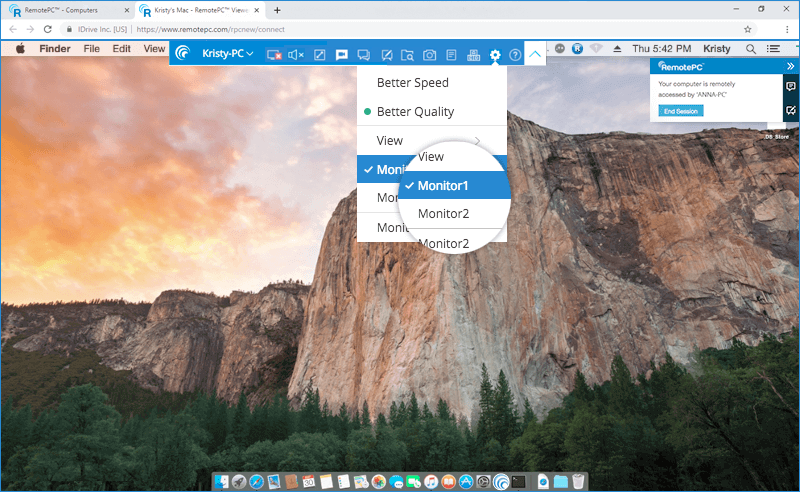
By default, the remote desktop screen does not autofit your local computer window.
To scale the remote computer desktop screen within your local computer,
- Inicie a sessão no RemotePC através do navegador Web.
- Select the online computer that you want to access and click 'Connect'.
- Enter the 'Personal Key' (if configured) and click 'Connect'. Remote access to the computer is established.
- Clicar to expand the menu bar.
- Clicar , mouse hover on 'View' and click 'Scale to fit'.
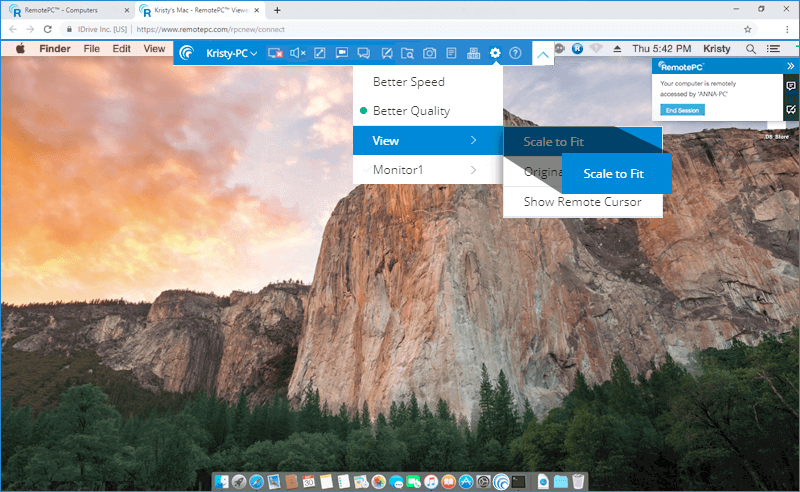
This will resize the remote computer desktop screen to fit within the local computer window.
You can also enter the full-screen mode by clicking  .
.
Como é que estabeleço uma ligação a um computador remoto, utilizando a minha credencial Windows/Mac/Linux?
Para aceder ao seu computador remoto utilizando uma credencial Windows/Mac/Linux,
- Inicie a aplicação RemotePC e inicie sessão.
- Clique em "Configurar agora!" e configure o seu computador para acesso remoto.
- Clicar apresentado no canto superior direito.
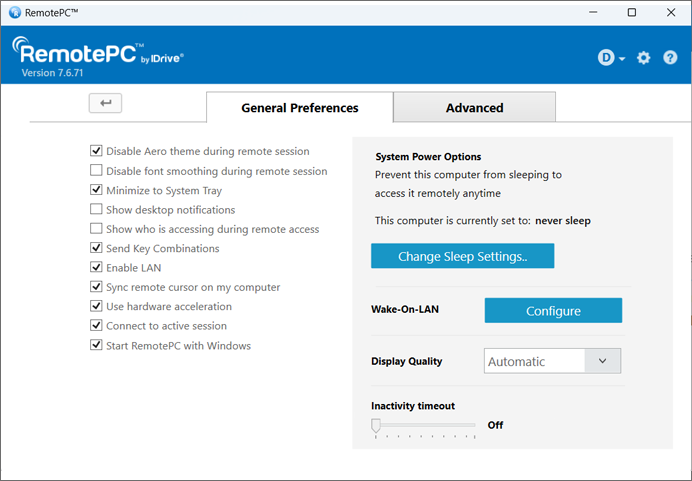
- Under 'General Preferences', select 'Allow windows Login'.
Durante a ligação ao computador remoto, ser-lhe-á pedido que introduza as suas credenciais Windows/Mac/Linux para iniciar sessão.
Nota:
- Make sure that the RemotePC application is installed in the remote machine and Always-On Remote Access is configured, before enabling this option.
- If you disable this option, you can access your computer by entering the Personal Key.
Yes, you can access 'Task Manager'/'Force Quit' options using Ctrl-Alt-Del on the remote computer.
To lock your remote computer (Windows),
- Inicie a sessão no RemotePC através do navegador Web.
- Select the online computer that you want to access and click 'Connect'.
- Enter the 'Personal Key' (if configured) and click 'Connect'. Remote access to the computer is established.
- Clicar to expand the menu bar.
- Clicar
 . The screen with options such as task manager, lock, sign out etc. will appear.
In Mac, only the option to Force Quit is available.
To force quit,
- Inicie a sessão no RemotePC através do navegador Web.
- Select the online computer that you want to access and click 'Connect'.
- Enter the 'Personal Key' (if configured) and click 'Connect'. Remote access to the computer is established.
- Clicar to expand the menu bar.
- Clicar . The 'Force Quit Applications' window will appear.
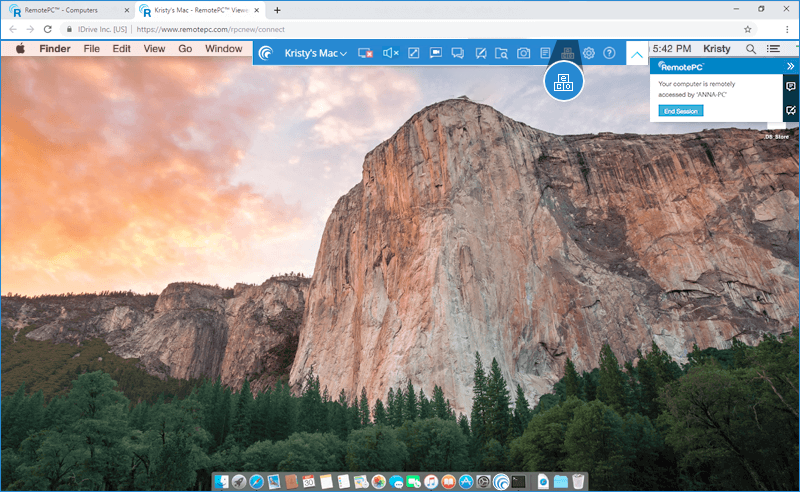
To disconnect a remote session, click  .
.
Em alternativa,
- Clicar to expand the menu bar.
- Click the computer name -> 'Disconnect'.
Yes, with RemotePC Viewer Lite you can print documents and images that are on your remote computers using a local printer.
Para imprimir,
- Inicie a sessão no RemotePC através do navegador Web.
- Select the online computer that you want to access and click 'Connect'.
- Enter 'Personal Key' (if configured) and click 'Connect'. Remote access to the computer is established.
- Seleccione o ficheiro no computador remoto que deve ser impresso.
- Open the document and use the Print command (or Ctrl+P in Windows and ⌘+P in Mac) to prepare the selected document for printing.
- Select RemotePC Printer in the window and click 'Print'.
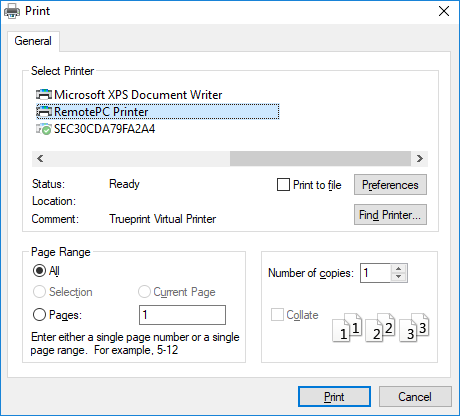
- Once the file appears, you can proceed with printing.
Nota:
- Ensure that the 'Allow Pop-ups' setting is enabled for your browser and a local printer is configured, before initiating the print operation.
- Se estiver configurada mais do que uma impressora local, a operação de impressão será efectuada utilizando a impressora predefinida.
- Remote printing is not supported for Microsoft Edge browser.
Yes, you can transfer files to and from the remote computer with RemotePC Viewer Lite.
To transfer files to the remote computer,
- Inicie a sessão no RemotePC através do navegador Web.
- Select the online computer that you want to access and click 'Connect'.
- Enter 'Personal Key' (if configured) and click 'Connect'. Remote access to the computer is established.
- Clicar
 to expand the menu bar.
 - Clicar
 . The file explorer will appear.

- Click 'Upload File'.
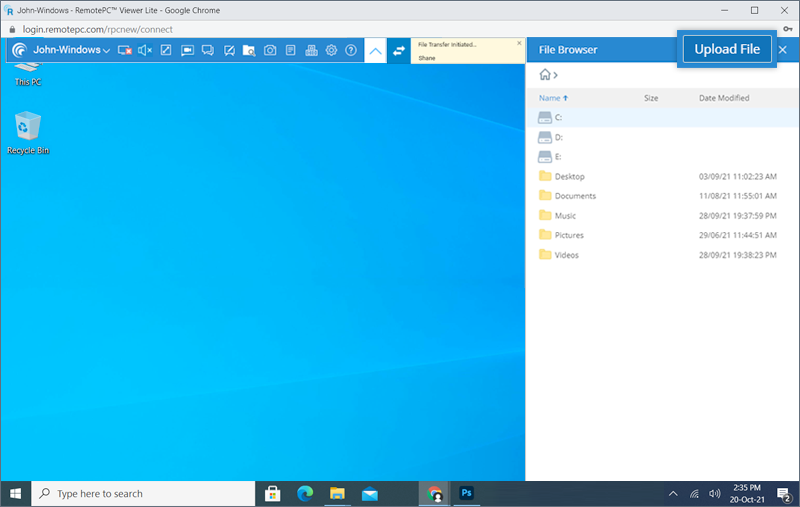
- Select the files to be transferred and click 'Open'.
A success message will appear on the completion of the file transfer.
Yes, you can transfer a file from the remote computer with RemotePC Viewer Lite.
To transfer files from the remote computer,
- Inicie a sessão no RemotePC através do navegador Web.
- Select the online computer that you want to access and click 'Connect'.
- Enter 'Personal Key' (if configured) and click 'Connect'. Remote access to the computer is established.
- Clicar to expand the menu bar.
- Clicar . The file browser panel displaying a tree view of the files on the remote computer will appear on your computer.

- Hover on the file you wish to transfer and click 'Download'.
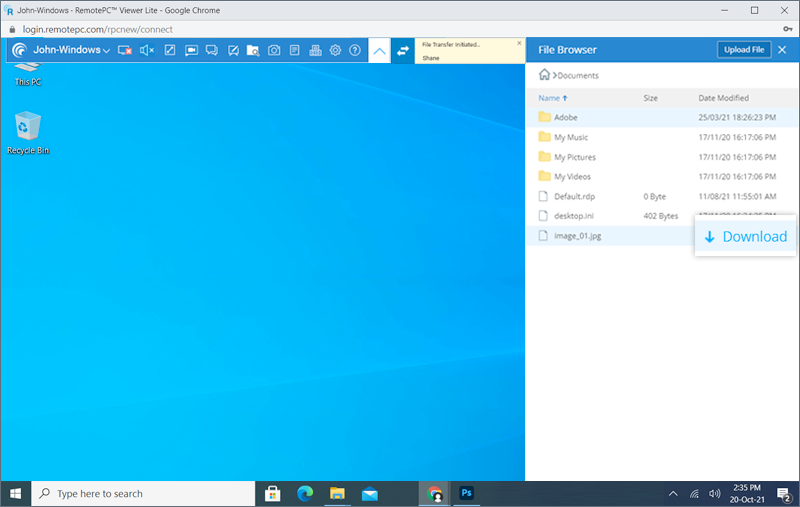
Note: Only one file can be transferred at a time from the remote computer.
You can drag and drop multiple files/folders from local to remote computer while accessing your machine via the web. Just select the desired files/folders on the local computer and drop them on to a specific location on the remote computer.
However, from the remote computer, you can drag and drop only files to your local computer.

Note: This feature is not supported for Internet Explorer and Safari (version 11 and below).
Yes, you can enable sound to listen to the audio or video on the remote computer through the local computer with RemotePC Viewer Lite.
To enable sound from the remote computer,
- Inicie a sessão no RemotePC através do navegador Web.
- Select the online computer that you want to access and click 'Connect'.
- Enter 'Personal Key' (if configured) and click 'Connect'. Remote access to the computer is established.
- Open the required audio or video on your remote computer.
- Clicar to expand the menu bar.
- Clicar
 to enable sound. You will be able to hear the audio or video playing on the remote computer through the local computer.
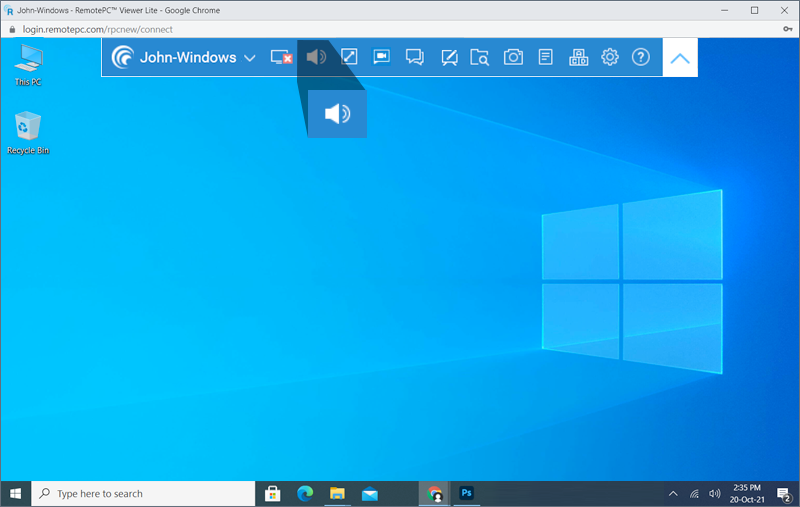
- Clicar
 to mute the sound.
The remote sound function is currently not supported for all browsers. The following list displays the browsers that support remote sound when accessing remote PC, Mac, or Linux machines.
| Local Computer OS | Remote Computer OS | Supported Browser |
|---|---|---|
| Janelas | ||
| Mac | ||
| Firefox | ||
| Chrome | ||
| Edge | ||
| Janelas | ||
| Chrome | ||
| Edge | ||
| Linux | ||
| Firefox | ||
| Chrome | ||
| Edge | ||
| Mac | ||
| Mac | ||
| Chrome | ||
| Firefox | ||
| Janelas | ||
| Chrome | ||
| Firefox | ||
| Linux | ||
| Chrome | ||
| Firefox | ||
| Linux | ||
| Mac | ||
| Chrome | ||
| Janelas | ||
| Chrome | ||
| Linux | ||
| Chrome |
No, you don't have to install any software to use RemotePC Viewer Lite as it is a web-based application. Just ensure that the RemotePC application is installed on the remote computers that you wish to access.
RemotePC Viewer Lite is supported on the following browser versions:
- Chrome: 67 and above
- Safari: 11.0 and above
- Firefox: 60.0 and above
- Microsoft Edge: 42.17 and above
Note: IE, Opera and other browsers are not supported.
To restart remote computer during the remote session,
- Log in to RemotePC via web browser and go to 'Computers'.
- Hover on the computer you wish to connect and click .
- During the session, click on the <computer name>.
- Click 'Restart'.

- In the confirmation popup, click 'Restart' or wait for the system to automatically restart.
Note: For Windows machines, an additional option to 'Restart in safe mode' will also appear. The remote session will be terminated and your computer will go offline briefly, but once the computer becomes ready for remote connection, its status will change to online.
RemotePC web interface displays the list of computers configured for remote access and their current status.
Below are the three statuses:
- Online – Computers that are ready for remote session.
- In Session – Computers that are in an active remote session.
- Offline – Computers that do not have any active internet connection or the remote access configuration has been disabled on it.
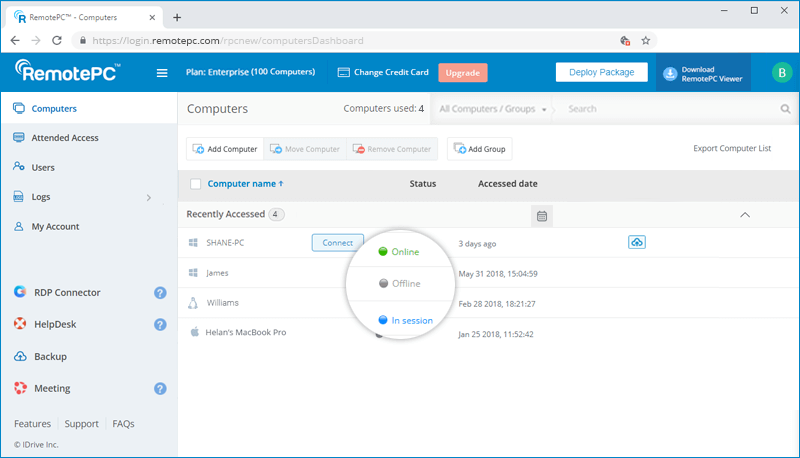
You can filter the list of computers based on these statuses.
Yes, it is recommended to open a remote session on a new browser instead of a new tab, for better performance. All you need to do is choose appropriate settings.
To modify settings,
- Inicie a sessão no RemotePC através do navegador Web.
- Clique no nome de utilizador apresentado no canto superior direito e clique em "A minha conta".
- Go to 'Settings'. Select 'New Browser Window' under the Viewer Lite section.
All new remote sessions will now open in a new browser window.
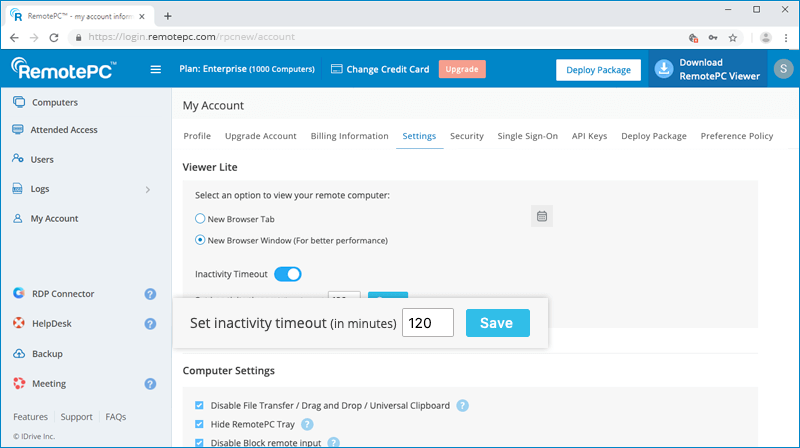
If a remote session is idle or inactive, it will automatically timeout based on the inactivity timeout specified under the 'Settings' tab. By default inactivity timeout is disabled for Viewer Lite.
To set inactivity timeout,
- Inicie a sessão no RemotePC através do navegador Web.
- Clique no nome de utilizador apresentado no canto superior direito e clique em "A minha conta".
- Go to 'Settings'. Click 'Inactivity Timeout' under the Viewer Lite section.
- Specify the inactivity duration in minutes after which the remote session will timeout automatically.
- Clique em "Guardar".
To select the time format,
- Inicie a sessão no RemotePC através do navegador Web.
- Click on your username and select 'My Account'.
- Aceder a "Definições".
- Under 'Time Format', select the format and click 'Save Changes'.
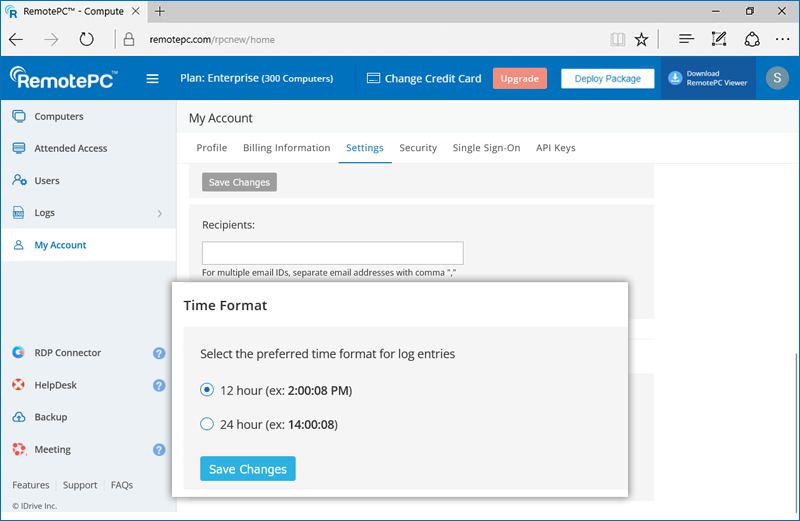
Note: The selected time format is applicable only for RemotePC Logs.
Yes, you can view the details of your computers that were remotely accessed from the 'Remote Access Logs' tab. Information such as computer name, viewer type, start time, end time, duration of remote session, and IP address will be displayed.
To generate logs for any time period between the last 90 days,
- Inicie a sessão no RemotePC através do navegador Web.
- In the 'Remote Access Logs' tab, select 'From Date' and 'End Date' and click 'Generate'.
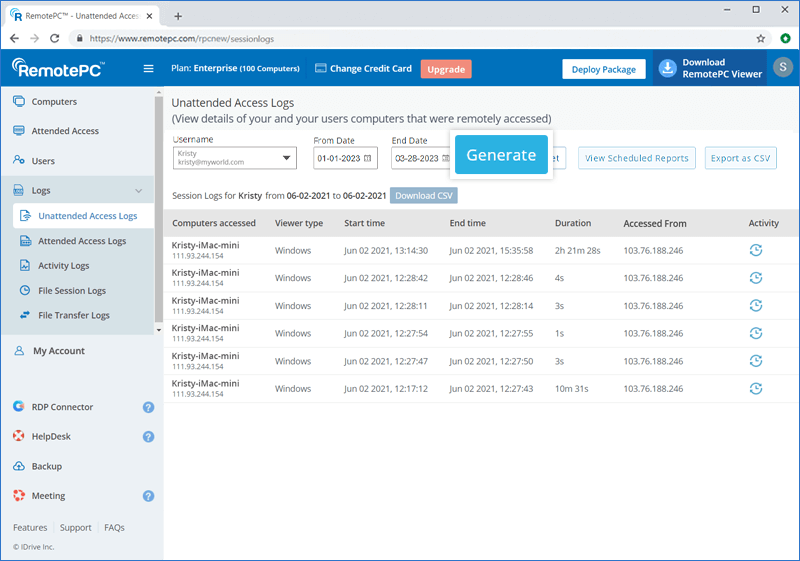
To download logs for last 90 days,
- In the 'Remote Access Logs' tab, select 'From Date' and 'End Date'.
- Click 'Download CSV'.
Logs prior to 90 days can be exported as CSV.
To export,
- Clique em "Exportar como CSV".

- Select the required username from the drop-down menu.
Note: Only the admin of Team or Enterprise plans will be able to view the logs for their users, by selecting a username. - Seleccione o mês e o ano e clique em "Descarregar".
You can also view session logs for a particular computer by clicking corresponding to the computer and selecting 'Logs' from the drop-down list.
You can view a list of all web-based activities for your account from the 'Web Activity Logs' tab.
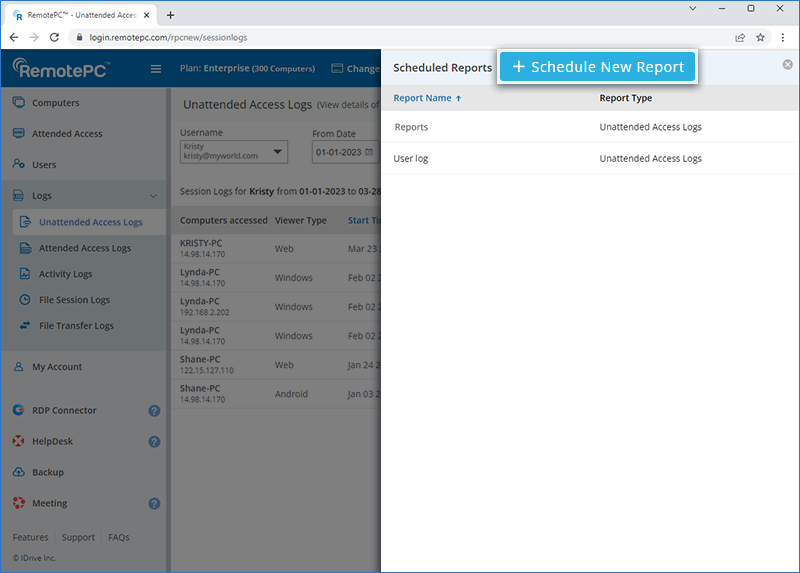
Yes, you can schedule log reports for your RemotePC account.
To schedule log reports,
- Inicie sessão no RemotePC através de um navegador da Web.
- Click 'Logs' and select any type of log you wish to schedule.
- Click 'View Scheduled Reports'.
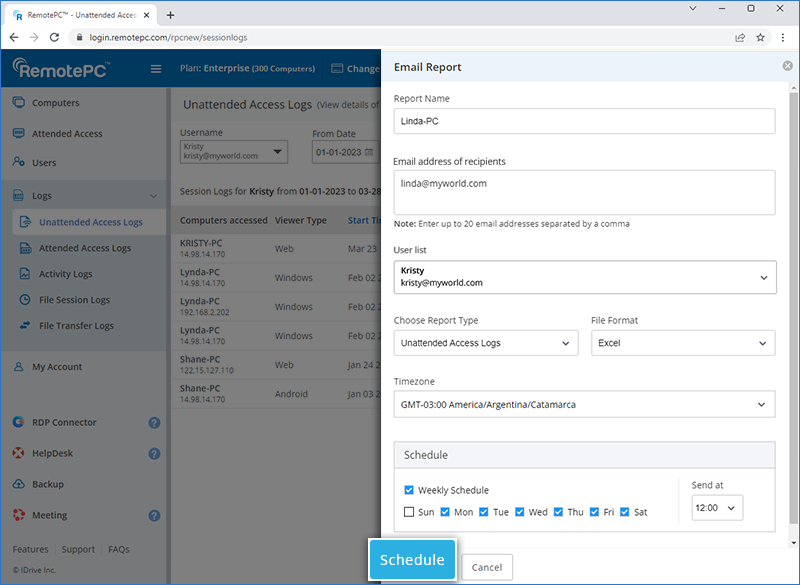
- On the 'Scheduled Reports' screen, click '+Schedule New Report'.
- Enter details such as report name, recipient email addresses, report type, format, and timezone. Select the user(s) whose reports are to be scheduled.
- Select the frequency for generating the reports.
- Click 'Schedule'. The report will be scheduled and shared with the specified recipients.
To edit the existing report,
- Inicie sessão no RemotePC através de um navegador da Web.
- Click 'Logs' and select any type of log you wish to edit.
- Click 'View Scheduled Reports'.
- Hover over the scheduled report you wish to edit and click
 .
. - Click 'Update' to save the changes.
To delete the existing report,
- Inicie sessão no RemotePC através de um navegador da Web.
- Click 'Logs' and select any type of log you wish to delete.
- Click 'View Scheduled Reports'.
- Hover over the scheduled report you wish to delete and click
 .
. - Click 'Delete' in the confirmation pop-up to delete the report.